If you have plans for a product that needs polymer design, NeuronicWorks has more than a decade of experience designing with plastics across multiple industries, including automotive, medical, and transportation, to name just a few. Contact us today to find out how NeuronicWorks can help you bring your polymer products to life.
So you want to design something in plastic?
Continuing our series on Design for Manufacturing, this month we’re looking at polymer design.
Plastic molding was born in the late 1800s, when a man named John Wesley Hyatt invented a method to inject celluloid in a mold to produce billiard balls. The balls were originally made from ivory and cost a fortune. Hyatt was able to blend camphor, nitrocellulose, and alcohol and mold those components under tremendous pressure to create affordable billiard balls. This was the start of our society’s love affair with synthetic plastics.
If you compare polymer design to our previous blog on sheetmetal design, you’ll see that designing plastic parts requires a different kind of effort and attention to detail. For a start, if you want to shape something out of plastic, there are a multitude of ways to do it—blow molding, vacuum forming, roto molding, and compression molding, to name just a few.
Two Types of Plastics: Thermoset and Thermoplastics
When planning for polymer design, you need to decide which kind of plastic will be best for your application: thermoset or thermoplastics.
Thermoset
A thermoset plastic has polymers that cure to form an irreversible chemical bond. The chemical bonding process that thermoset plastics undergo permanently sets their shape and essentially makes them incapable of melting. This is why thermosets are usually used in high heat applications.
Examples of thermoset products include:
Thermoplastic
A thermoplastic is a polymer that will soften once it gets heated. When it gets to a soft or liquid state, it is then able to be molded and shaped to a specific form; making this material ideal for plastic molding. Because it can be reheated and reformed, it is able to be remolded and recycled without impacting the material’s physical properties.
Here are a few examples of thermoplastic products:
The example that you typically hear about how to differentiate between thermoset and thermoplastics is the egg and butter analogy.
If you take a fresh egg, crack it open and fry it in a pan, you have a delicious fried egg. But if you try to return that fried egg to its original liquid state… Good luck! It cannot be done. The chemical bond is permanent and cannot be reversed. This change is akin to what happens with thermoset polymers.

However, if you take a solid block of butter you can melt it into a liquid state. You can then make it a solid again by allowing it to cool. This process can be repeated time and time again and the material will always keep its chemical bond. This is how thermoplastics work.

Do you have an idea for a plastic part? Fantastic. Let’s make it happen! Here are the four basic steps to designing a product from plastic.
Step 1: Design the product.
This is where you hear of the “napkin sketches” where people scribble and sketch out the basic ideas of the idea or product they want to create. Once you have a basic idea in mind, our team of industrial designers and mechanical engineers at NeuronicWorks can help turn your sketch into a 3D CAD model for manufacturing.
Once you have the manufacturable 3D model, you’re off to the races! (Keep in mind that for brevity we’re skipping a few steps in creating a manufacturable 3D CAD file—we’ll cover those in another post).
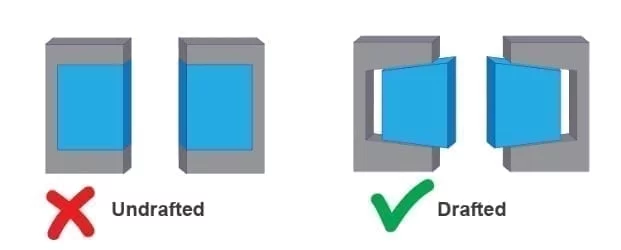
It’s important to design the part so it can be easily molded and removed from a mold. That’s why you’ll want to add draft angles on vertical walls and features of the part. You can see that most mass manufactured plastic parts with a straight wall include slight angles on them. These drafts range from 0.5deg to 2 degrees, depending on the size of the part. This makes it easier for the part to eject from the mold, and avoids the part scraping against the sidewalls of the molds as would happen with straight walls. You can even see this is your ice cube tray at home, or your muffin pan. The cavities have a slight angle to help you release the cubes or muffins from their molds.
Step 2: Choose your material and process.
Depending on the application and environment your product will be exposed to, the choice of the correct material is paramount. Is your product a medical device? Is it used mostly outdoors? Is it exposed to flames? Harsh chemicals? Each of these questions have an impact on the selection of materials.
The material choice is typically made between our engineers and the engineers at the mold-making factory. This is their territory, and we rely on their expertise to help choose a correct material. Here’s a list of the most common materials you’ll see in the industry:
ABS (Acrylonitrile Butadiene Styrene)
Most commonly used plastic in the injection molding world. It has good chemical stability, high impact and mechanical strength, low water absorption, good corrosion resistance and is easy to form. ABS can also be blended with other polymers to increase the range of properties (mechanical, thermal, etc.) If you’re designing a product such as a small home appliance, children’s toys, gaming, or electronic enclosures, ABS is one of your go-to materials.
PC (Polycarbonate)
Polycarbonate is most commonly used when you need a part to be transparent and impact resistant. It is dent and scratch resistant and has excellent UV resistance. It is widely used in sports equipment, medical devices, and the eyewear industry. You can also blend PC and ABS to get the strength and heat resistance of PC and flexibility of ABS.
Nylon (Polyamide)
Nylon is a great synthetic thermoplastic. It is extremely strong, temperature- and wear-resistant, and can be easily machined or molded. It has a wide range of applications, from vehicle parts, to mechanical equipment, and even fabric.
Plastic polymers (whether it be thermoset or thermoplastic) can be shaped in multiple ways. It is vital to work in tandem with the applications engineer to find the correct material and process to manufacture your part.
Here’s what you need to understand about the different process options:
Injection Molding / Overmolding
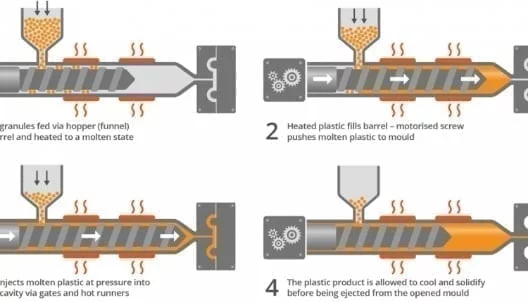
The most common method for forming plastics. When you need mass-production and consistency, it’s hard to beat injection molding. Little plastic pellets are poured into a hopper and then released into a housing where a screw mechanism rotates and melts the plastic into a liquid state. Once liquified, the plastic is “injected” with very high pressure into the cavity of the mold. Lastly, the plastic cools and hardens, the molds are opened, and voila! You have your plastic part. Another benefit to injection molding is that you can combine materials. You can have both plastic and rubber fused on the same part. This process is called overmolding. Injection molding is used everywhere. Sports equipment, medical devices, car parts, toys, tools and consumer goods.
Here are a few examples of injection molded products:
Here’s an example of an overmolded part (hard plastic and soft rubber or TPE overmold):

Blow molding
Plastic is extruded, then clamped tight together by a steel mold. Air is then blown in the inside center of the part to “push” and form the desired shape of the plastic part. Look around your house or office for a bottle, liquid soap container, or plastic fuel tank. Those products are made using the blow molding method.
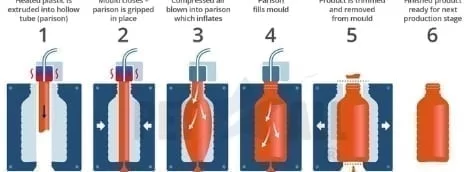
Here are a few examples of blow molded products:
Thermoforming
This process involves heating a plastic sheet , placing it on top of a mold, and sucking out all the air so it hugs the mold to create your part. It is widely used in the packaging industry for trays, inserts, and clamshell packaging. It is also a favorite of hobbyists who dabble in cosplay or prop making. Have you ever bought a cheap plastic mask for Halloween, or a product that was encased in those impossible to open clamshell packaging? Thermoforming in action!
Here are a few examples of thermoformed products:
Step 3: Physical prototype
Great, now you have your plastic part as a 3D CAD model. What’s next? Get it 3D printed and test it out. Get some real-world feedback and test scenarios. As an industrial designer, I always love to see how people interact with products. This is the stage where you will get valuable feedback and can make appropriate design changes.
Is the fit right? Does it have the correct proportions? Do the holes line up where they’re supposed to? Are the tolerances acceptable? 3D printing technology is advancing in leaps and bounds and we use SLA or polyjet models to give us a good indication of what the final part will look like. In our experience, SLA or polyjet models have one of the highest printing tolerances in the industry, thus giving us an almost identical part to that which we’ll receive from the injection molders. Thoroughly check out your physical model and 3D CAD model before moving on. It's considerably easier and cheaper to make changes at this stage than it is after the molds are produced.
SLA Prints:
Polyjets Prints:
With a 3D CAD model and a physical printed prototype that you are satisfied with, your next step is to get samples made. Typically, at this stage molders will make what's called soft tooling.
You’re probably thinking that soft tooling is made with a softer material than steel or aluminum...And you would be correct!
Soft tooling involves making an initial mold out of a urethane (silicone) and casting your part inside. Silicone can capture the finest of details and is inexpensive. This is the best option to make a low-production run (1-30 parts) and is extremely useful for a first look and feel of what your parts will look and feel like, using the actual material chosen. ![]()
Step 4: Production
After you are satisfied with the small run of prototypes from the soft tool, you are ready to move to the high-production stage—the hard tooling. This stage is where the mold for your part is made, in either aluminum or steel.
Aluminum Molds:
Because aluminum is a softer metal, it is easier to machine and somewhat more cost-effective for low production runs. However, some engineers have made valid arguments for using aluminum molds for high-volume production.
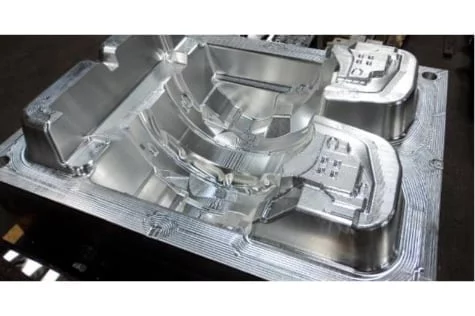
Steel Molds:
Steel molds, on the other hand, are the most durable and will give you the most longevity for your production. They are, however, the most expensive molds. Depending on the finish you want from your part, the steel alloy you choose for your mold will depend on the complexity of your part. If you are looking for an optically clear part, you may have to go with a stainless-steel polished mold (which will be expensive). Once you have a hardened steel mold, you can now produce thousands or even millions of parts.
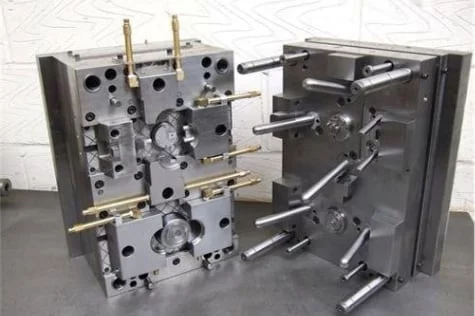
And with that, you now have your beautiful molded part. It took some work, but you’re here!
There you have it! A quick rundown of how to get a design made of plastic.
Now that you understand how plastic parts are made and what goes in to manufacturing them, you’ll be better equipped to know what to look for in a quality polymer design. In the future article we will discuss other post-mold processes that you can incorporate into your design.
Let us know what other deep dives you’d like to see and stay tuned for the next article in our Design for Manufacturing series!


